Ever wanted to really nail that zombie look for Halloween or a costume party? It’s not just about throwing on some ripped clothes. Getting that truly creepy, undead vibe comes down to good zombie makeup. This guide will walk you through everything you need to know, from basic tools to advanced tricks, so you can transform yourself into something truly terrifying.
Key Takeaways
- Zombie makeup is super popular for Halloween and cosplay, letting people get really creative.
- You need specific tools like face paints, liquid latex, and fake blood for good zombie makeup.
- Making skin look pale, adding shadows, and creating textures are important steps for a decayed look.
- Learning how to make fake wounds and use fake blood makes your zombie look way more real.
- Using dark shadows around the eyes and contouring cheeks helps create that gaunt, undead face.
Embracing Your Inner Undead
The Rising Popularity of Zombie Makeup for Halloween and Cosplay
Zombie makeup? It’s everywhere! Seriously, if you’re hitting up a Halloween party or a cosplay event, chances are you’ll see someone rocking the undead look. It’s become a total must-have skill for anyone into horror or dressing up. The cool thing is, it’s not just for pros; people of all ages are getting into it. From haunted houses to zombie walks, this trend is blowing up, mixing scary with creative in a way that’s hard to forget. It’s like everyone wants to unleash their inner monster, and zombie makeup is the perfect way to do it. You can even use natural concealers to create a base for your zombie look.
Why YouTube Zombie Makeup Videos Are a Hit Among Horror and Makeup Enthusiasts
YouTube is the spot for zombie makeup inspo. I mean, you can find everything from super simple tutorials to crazy professional designs. What’s so great about it? Well, there’s a ton of different styles, step-by-step instructions, and creative ideas for bringing zombies to life. It’s like the perfect mix of horror, art, and storytelling that keeps people hooked. Plus, you can learn at your own pace and try out new techniques without feeling intimidated. It’s a total game-changer for makeup fans.
How Zombie Makeup Can Unleash Your Creative Potential
Zombie makeup is way more than just slapping on some fake blood. It’s a chance to really let your creativity run wild. Want to create a freshly risen undead? Go for it. Prefer a decaying walker from a post-apocalyptic wasteland? That’s cool too. The possibilities are endless. You can play with different textures, colors, and techniques to create a look that’s totally unique. It’s all about expressing yourself and pushing the boundaries of what’s possible with makeup. Plus, it’s just plain fun to see the crazy transformations you can achieve.
Zombie makeup isn’t just about looking scary; it’s about telling a story. Think about your character’s backstory. Were they a soldier? A scientist? A soccer mom? Let their past influence their zombie look. Add details that hint at their former life, like a tattered uniform or a lab coat covered in blood. It’s these little touches that will really bring your undead character to life.
Essential Tools for Realistic Zombie Makeup
Must-Have Tools and Products for Authentic Zombie Makeup
So, you want to turn yourself into a convincing zombie? Awesome! First, you’re gonna need the right gear. Think of it like stocking up for a battle, but instead of fighting, you’re decaying. Here’s a rundown of what you’ll need:
- Face paints and cream makeup: These are your base colors. You’ll use them to create that pale, lifeless skin tone that screams “undead.” Don’t forget bruise colors – purples, greens, and yellows are your friends.
- Liquid latex and prosthetics: This is where things get fun. Liquid latex is great for creating realistic wounds and decaying skin effects. Prosthetics can take your look to the next level, adding depth and dimension.
- Fake blood and gore gel: No zombie is complete without blood! Fake blood adds that final touch of horror. Gore gel is thicker and can be used to create more gruesome, clotted effects.
- Sponges, brushes, and applicators: You’ll need these to apply your makeup precisely. Sponges are great for blending, while brushes are perfect for detail work.
Don’t skimp on quality. Cheap makeup can irritate your skin and won’t look as good. Invest in decent products, and they’ll last you through many zombie transformations.
Techniques to Recreate Blood, Wound, and Decaying Skin
Okay, you’ve got your tools. Now, let’s talk technique. This is where the magic happens. It’s all about creating illusions and making your skin look like it’s, well, falling apart. Here are some key techniques:
- Wound creation: Liquid latex is your best friend here. Mix it with tissue or cotton to create torn skin effects. You can also use scar wax to build up the wound and make it look more three-dimensional.
- Blood effects: There are tons of ways to use fake blood. Drips, splatters, oozing wounds – the possibilities are endless. Experiment with different application methods to see what looks best.
- Decayed skin: Stippling latex or cream makeup can create a textured, rotting appearance. Use a sponge to dab the makeup onto your skin, creating a rough, uneven surface.
- Bruises and shadows: Blending purples, blues, and greens can create authentic-looking bruises. Use these colors to add depth and dimension to your zombie makeup.
Achieving the Perfect Zombie Special Effects Look
So, how do you pull it all together? It’s about layering and attention to detail. Start with a pale foundation to create that lifeless complexion. Then, add shadows and contours to create sunken features. Use liquid latex to create wounds and decaying skin effects. Finally, add fake blood and gore to complete the look.
Here’s a simple table to help you remember the key steps:
| Step | Technique |
|---|---|
| 1. Base | Pale foundation |
| 2. Shadows | Contouring with grey and brown tones |
| 3. Wounds | Liquid latex and tissue |
| 4. Blood | Fake blood and gore gel |
| 5. Details | Dirt, grime, and other finishing touches |
Remember, practice makes perfect. Don’t be afraid to experiment and try new things. The more you practice, the better you’ll get at creating realistic zombie makeup.
Mastering the Art of Zombie Skin
Creating a Pale, Lifeless Complexion
Okay, so first things first, you gotta ditch that healthy glow! We’re aiming for undead here, not sun-kissed. Think about what makes someone look sick or, well, dead. It’s all about losing that natural color.
Here’s what I usually do:
- Start with a white or very pale foundation. Don’t be shy, really layer it on.
- Mix in a touch of grey or even a tiny bit of green. Seriously, just a little! You don’t want to look like the Hulk’s zombie cousin.
- Pay attention to your neck and ears! Nothing screams “fake” like a pale face and a tan neck. Blend, blend, blend!
I always tell people to take a picture with the flash on. It’ll show you if you’ve missed any spots or if your blending is off. Trust me, it’s a lifesaver.
Adding Depth with Contouring and Shadows
Alright, now that we’ve got the base down, it’s time to add some dimension. Zombies aren’t flat, even if they are, you know, dead. Contouring is your best friend here. We’re talking about creating sunken eyes and hollow cheeks. Think about where shadows would naturally fall on a skull.
- Use a grey or brown eyeshadow (matte, always matte!) to create shadows under your cheekbones. Suck in your cheeks to find the right spot.
- Don’t forget the temples! A little shadow there can make a huge difference.
- Blend, blend, blend! I know I keep saying it, but it’s so important. You don’t want harsh lines.
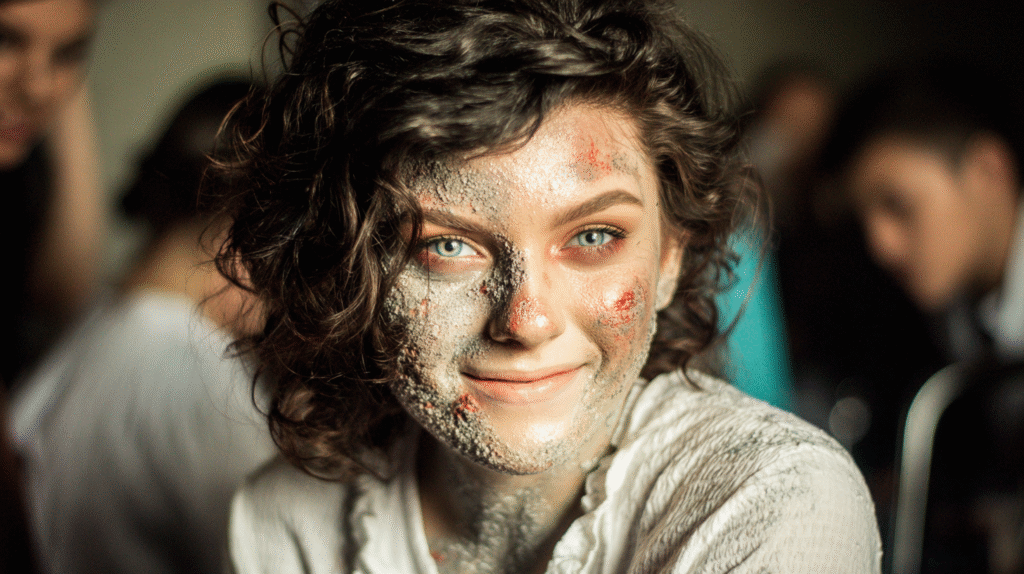
Achieving Decayed and Textured Skin Effects
This is where things get really fun! We’re going to make your skin look like it’s, well, rotting. There are a bunch of ways to do this, and it really depends on how gross you want to get. The goal is to add texture and make it look like your skin is falling apart.
Here are a few ideas:
- Liquid latex and tissue: Tear up some tissue, layer it with liquid latex, and stick it to your face. Once it’s dry, you can rip holes in it to create wounds.
- Stipple sponge: Use a stipple sponge with some dark brown or grey paint to create a mottled, uneven texture.
- Gelatin: You can actually make fake skin with gelatin! There are tons of tutorials online. It’s a bit messy, but it looks super realistic.
| Technique | Materials | Realism Level | Mess Factor |
|---|---|---|---|
| Latex and Tissue | Latex, Tissue | Medium | Medium |
| Stipple Sponge | Sponge, Paint | Low | Low |
| Gelatin | Gelatin, Glycerin | High | High |
Don’t be afraid to experiment! The more texture you add, the more realistic your zombie skin will look. Just remember to have fun with it!
Crafting Convincing Zombie Wounds and Gore
Techniques for Realistic Wound Creation
Okay, so you want to make some seriously gross zombie wounds? It’s all about layering and texture. Start with a base of liquid latex. You can tear up some tissue paper or cotton balls and stick them onto the latex to create a raised, uneven surface. Once that dries, add some color with cream makeup – think reds, purples, and browns. Don’t be afraid to get messy! The more irregular, the better. For a really nasty effect, try adding a bit of fake blood while the latex is still tacky so it gets trapped in the crevices.
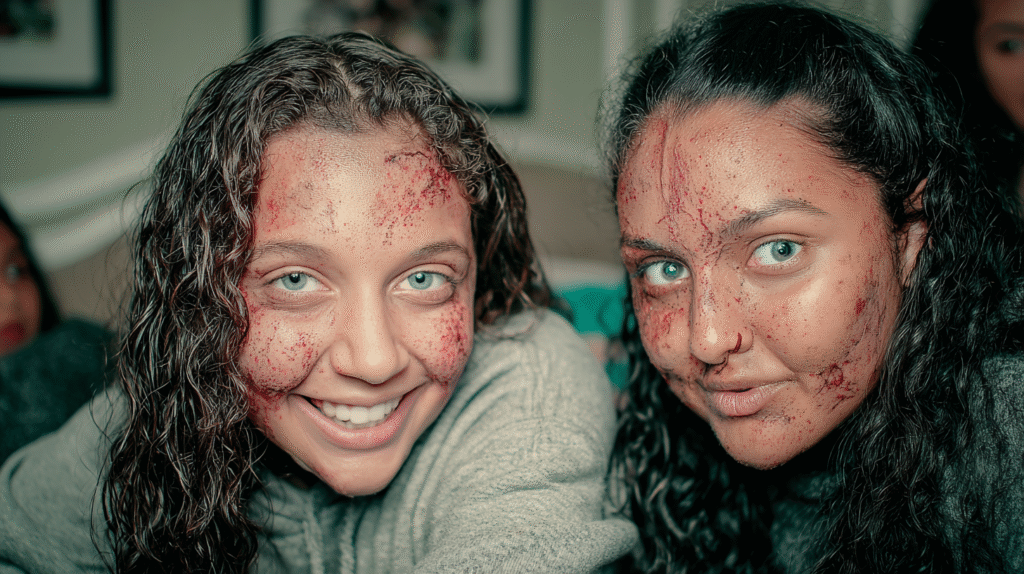
Applying Fake Blood for Authentic Drips and Splatters
Fake blood is your best friend when it comes to zombie makeup. But not all fake blood is created equal. Some is too thin and watery, while others are too thick and gloopy. You want something in between that will drip realistically but still have some body to it. I like to use a combination of different types of fake blood for different effects.
For drips, use a thinner blood that will run down the face. For splatters, use a thicker blood that will create more impact. You can even mix in a little bit of coffee grounds or cocoa powder to give the blood some texture. Experiment with different application methods – a brush, a sponge, or even just flicking it with your fingers.
Utilizing Gore Gel for Horrific Effects
Gore gel is the secret weapon for taking your zombie makeup to the next level. It’s basically a thick, sticky gel that you can use to create all sorts of gruesome effects, like oozing wounds, exposed bone, and decaying flesh. You can buy it at most costume shops or online. To use it, simply apply it to the area you want to zombify and then sculpt it into the desired shape. You can use a toothpick or a small brush to create fine details. Once you’re happy with the shape, add some color with cream makeup and fake blood. Gore gel is especially effective for creating deep, festering wounds that look like they’re infected.
One thing I’ve learned is that less is often more. You don’t need to cover your entire face in blood and gore to create a convincing zombie look. Sometimes, just a few strategically placed wounds and some subtle blood drips can be more effective than a full-on gore fest.
Here are some ideas for using gore gel:
- Exposed bone: Use gore gel to create the illusion of bone sticking out of a wound.
- Oozing sores: Apply gore gel to small areas of the skin and then add some fake blood to create the look of oozing sores.
- Decaying flesh: Mix gore gel with cream makeup and then apply it to the skin to create the look of decaying flesh.
Enhancing Facial Features for a Ghoulish Look
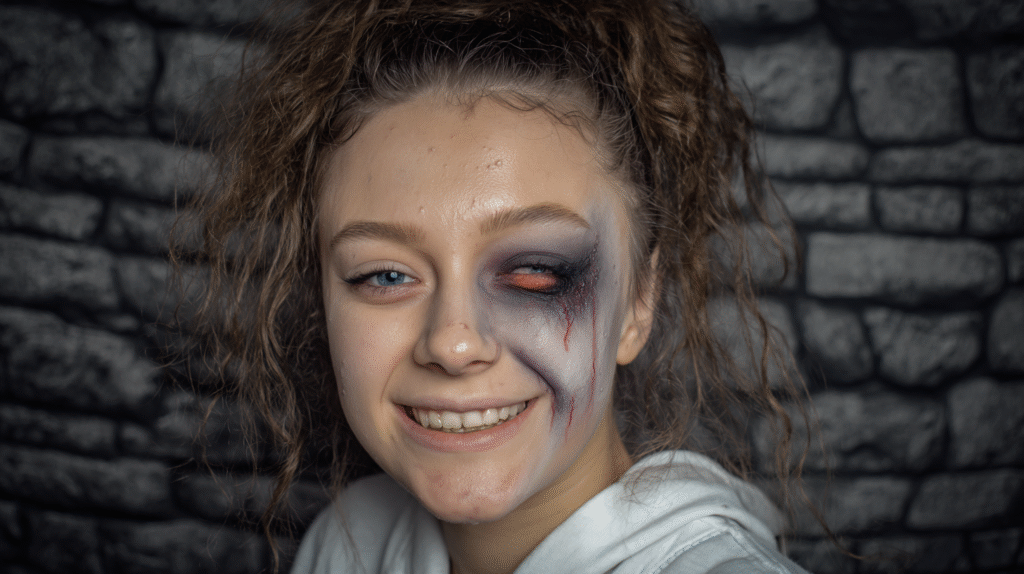
Creating Sunken Eyes with Dark Shadows
To really sell that undead look, the eyes are key. You want to make them look like they’ve receded into the skull. Start with a dark eyeshadow – blacks, purples, and deep reds work great. Apply it generously around the entire eye socket, blending upwards towards the brow bone. Don’t be afraid to go heavy on the color; zombies aren’t exactly known for their subtle makeup. A little bit of black eyeliner dramatic effect can also help to make the eyes pop (or, rather, not pop, in a lively way).
Achieving a Gaunt Appearance with Cheek Contouring
Zombies are usually depicted as being super skinny and emaciated, so we need to recreate that gaunt look with some clever contouring. Suck in your cheeks to find the hollows, and then apply a dark contour powder (grey or brown shades work best) along those lines. Blend well to avoid harsh lines, but keep the contour quite defined. You can also add a touch of contour to your temples and jawline to further emphasize the sunken appearance. It’s all about creating shadows to give the illusion of bone structure.
Transforming Lips for a Decayed Effect
Zombie lips aren’t exactly kissable, so we need to make them look suitably decayed. Start by covering your natural lip color with a pale foundation or concealer. Then, use a mix of dark purple, grey, and black lipsticks or eyeshadows to create a mottled, lifeless effect. You can also add some cracks and lines with a fine-tipped eyeliner brush to simulate dryness and decay. For an extra touch of grossness, apply a tiny bit of fake blood silicone prosthetic around the corners of the mouth to look like you’ve been feasting on brains.
I remember one time I tried to do zombie makeup for a party, and I completely forgot about the lips. I had the sunken eyes and the gaunt cheeks down, but my bright pink lipstick totally ruined the effect. Lesson learned: don’t neglect the lips if you want to achieve a truly convincing zombie look!
Advanced Zombie Makeup Techniques
Layering for Depth and Dimension in Zombie Makeup
Layering is key to making your zombie makeup pop. It’s not just about slapping on some pale foundation and calling it a day. Think about how real skin looks – it has different tones, textures, and imperfections. Start with a base layer of pale foundation, then add shadows with grey and brown tones to create sunken features. Next, use reds and purples around the eyes and mouth to simulate broken capillaries and early stages of decay. Finally, stipple on some green or yellow to mimic the look of rotting flesh. Each layer adds to the overall depth and realism of your zombie.
Incorporating Prosthetics for Extreme Transformations
Want to take your zombie look to the next level? Prosthetics are your friend. You can buy pre-made wounds and scars, or even create your own using liquid latex and cotton. Apply these prosthetics strategically to create realistic-looking gashes, missing chunks of flesh, or exposed bone. Remember to blend the edges of the prosthetics seamlessly into your skin using makeup. This will make them look like they’re actually a part of you. Don’t be afraid to get creative and experiment with different types of prosthetics to achieve the perfect zombie special effects look.
Experimenting with Different Zombie Makeup Styles
Zombie makeup isn’t one-size-fits-all. There are tons of different styles you can try, from freshly undead to severely decayed. Consider these options:
- Freshly Undead: Minimal decay, mostly pale skin and dark circles.
- Classic Zombie: Some wounds, decaying skin, and a generally disheveled appearance.
- Severely Decayed: Lots of exposed bone, missing flesh, and a generally gruesome look.
Think about your zombie’s backstory. Were they recently turned, or have they been wandering the earth for years? This will influence the type of makeup you use and the overall look you create.
Don’t be afraid to mix and match elements from different styles to create your own unique zombie character. The most important thing is to have fun and let your creativity shine.
Bringing Your Zombie Character to Life
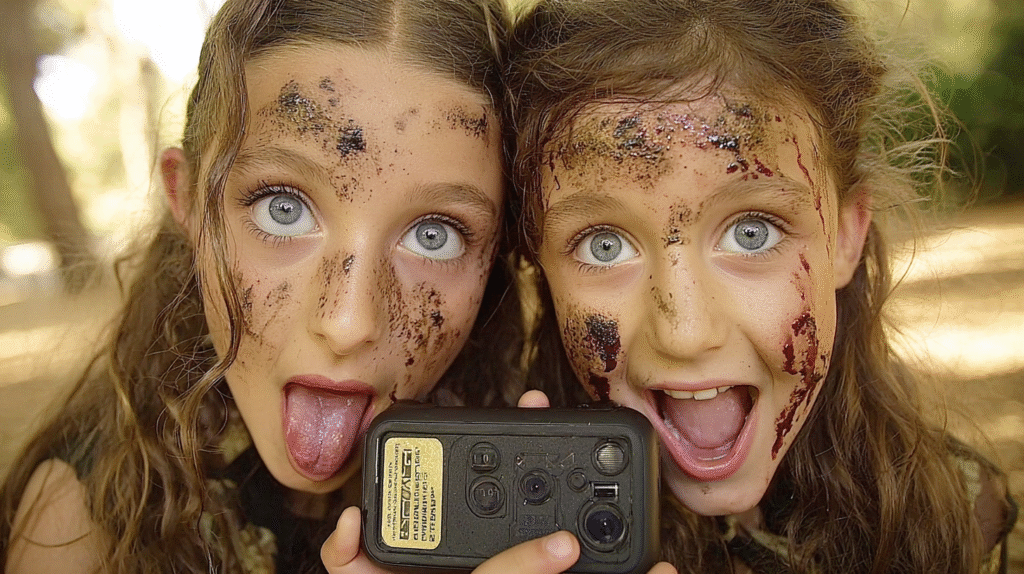
Adding Strategic Dirt and Grime for Realism
Okay, so you’ve got the pale skin, the sunken eyes, and maybe even some gnarly wounds going on. But something’s still missing, right? It’s that lived-in (or, uh, died-in) look. That’s where dirt and grime come in. Think about it: zombies aren’t exactly known for their hygiene. They’re dragging themselves through who-knows-what, so they’re gonna be filthy.
Here’s how to get that effect:
- Powder Power: Use dark brown or black powder eyeshadow or even actual dirt (sterilized, of course!) to create shadows in the creases of your face, around wounds, and on your clothes.
- Grease It Up: A little bit of petroleum jelly or hair wax mixed with dark pigment can create a greasy, grimy look. Apply it sparingly to your face, hair, and clothes.
- Don’t Forget the Details: Pay attention to areas that would naturally collect dirt, like around your fingernails, in your hairline, and on the edges of your clothing. This attention to detail will really sell the effect. You can find many zombie makeup tutorials online.
Adding dirt and grime isn’t just about making you look dirty; it’s about telling a story. It suggests that you’ve been through something, that you’ve been surviving (or not) in a harsh environment. It adds depth and realism to your character.
Accessorizing with Torn Clothing and Props
Your makeup is only half the battle. The right clothing and props can really take your zombie transformation to the next level. Think about what your character might have been wearing when the apocalypse hit. Were they a doctor? A construction worker? A prom queen? Your clothing should reflect their former life, but with a zombie twist.
Some ideas:
- Torn and Tattered: Rip, tear, and distress your clothing to make it look like you’ve been through a struggle. Use scissors, sandpaper, or even a cheese grater to create realistic-looking damage.
- Stains and Splatters: Add fake blood, dirt, and other stains to your clothing to make it look like you’ve been feasting on brains (or just dragging yourself through the mud).
- Props, Props, Props: A weapon (fake, of course!), a tattered backpack, or even a half-eaten sandwich can add personality and depth to your character. Consider the psychological impact of survival in a zombie world.
Reflecting Your Character’s Backstory Through Makeup
Zombie makeup isn’t just about looking scary; it’s about telling a story. Who was your character before they became a zombie? What happened to them? Your makeup can reflect their backstory and add depth to your performance.
Consider these questions:
- How long have they been a zombie? A newly turned zombie might have fresher wounds and brighter colors, while an older zombie might be more decayed and faded.
- What was their cause of death? A zombie who was shot might have a bullet wound, while a zombie who was bitten might have bite marks.
- What was their personality like? A zombie who was once a neat freak might still have some remnants of their former self, while a zombie who was always a slob might be even more disgusting now.
By thinking about your character’s backstory, you can create a zombie look that is both scary and believable. Have fun with it, and don’t be afraid to experiment! You can find many special effects makeup supplies online.
Wrapping It Up: Your Undead Transformation Awaits
So, there you have it. We’ve gone over a bunch of ways to get that really good zombie look. It takes some practice, sure, but it’s also a lot of fun. Don’t be afraid to try new things and see what works for you. The more you mess around with different ideas, the better you’ll get. Pretty soon, you’ll be making some seriously creepy zombies that’ll freak everyone out. Just remember to have a good time with it, and you’ll be all set for your next big undead moment.
Frequently Asked Questions
What stuff do I need to do zombie makeup?
For a spooky zombie look, you’ll need things like pale face paint, liquid latex for fake skin, fake blood, and makeup brushes. These items help you make realistic wounds and a sickly skin tone.
How do I make fake wounds and rotting skin?
To make wounds, you can use liquid latex with tissue paper to build up layers that look like torn skin. For blood, just drip or splatter fake blood where you want it. To make skin look decayed, dab on liquid latex or thick makeup to create a bumpy texture.
How do I make my face look pale and sunken like a zombie?
Start with a really light foundation or face paint to make your skin look super pale. Then, use dark eye shadow around your eyes to make them look sunken. You can also use grey and brown makeup to make your cheeks look hollow.
Is fake blood really necessary for a good zombie look?
Yes, fake blood is super important! It adds that gross, realistic touch. You can use it for drips, splatters, or to make wounds look fresh and gooey.
Can I learn zombie makeup from YouTube videos?
Definitely! YouTube has tons of videos for all skill levels. You can find simple guides for beginners or more advanced ones if you want to try complicated special effects.
What else can I do to make my zombie costume more real?
To make your zombie look even better, add some dirt and grime with brown and black makeup. You can also wear old, torn clothes and carry props like a broken toy or a fake weapon to show what kind of zombie you are.

Attractive section of content. I just stumbled
upon your blog and in accession capital to assert that I get actually enjoyed
account your blog posts. Anyway I’ll be subscribing to your augment and even I achievement
you access consistently fast.
As someone who values efficiency, discovering tools that streamline complex processes-like AI Tax Assistant-is a game-changer in both gaming and business strategy.
Interesting read! It’s smart to prioritize security when exploring online gaming – platforms like bbjl seem to understand that with their verification steps. Curious about trying a new app? Check out bbjl download for a curated experience! Always gamble responsibly, of course.
I do agree with all of the ideas you’ve presented in your post. They are really convincing and will certainly work. Still, the posts are very short for starters. Could you please extend them a little from next time? Thanks for the post.
I couldn’t resist commenting
Hey there! This post couldn’t be written any better! Reading through this post reminds me of my old room mate! He always kept talking about this. I will forward this post to him. Pretty sure he will have a good read. Thanks for sharing!
**mind vault**
mind vault is a premium cognitive support formula created for adults 45+. It’s thoughtfully designed to help maintain clear thinking
Heya i’m for the first time here. I found this board and I find It really useful & it helped me out a lot. I hope to give something back and aid others like you aided me.
hello there and thank you for your information – I have certainly picked up something new from right here. I did however expertise a few technical issues using this web site, as I experienced to reload the web site lots of times previous to I could get it to load correctly. I had been wondering if your web hosting is OK? Not that I’m complaining, but slow loading instances times will often affect your placement in google and can damage your high quality score if advertising and marketing with Adwords. Well I’m adding this RSS to my email and could look out for much more of your respective intriguing content. Make sure you update this again soon..
I and also my buddies were actually going through the nice advice from your web blog then unexpectedly I got a terrible suspicion I never expressed respect to the web blog owner for them. Those boys are actually totally happy to read through them and already have quite simply been tapping into these things. Appreciation for getting so helpful and also for picking variety of perfect tips most people are really desperate to be aware of. My very own sincere apologies for not expressing gratitude to you sooner.
Hmm is anyone else experiencing problems with the images on this blog loading? I’m trying to determine if its a problem on my end or if it’s the blog. Any feed-back would be greatly appreciated.
I’ve been exploring for a little bit for any high quality articles or blog posts on this kind of area . Exploring in Yahoo I at last stumbled upon this site. Reading this info So i am happy to convey that I have an incredibly good uncanny feeling I discovered exactly what I needed. I most certainly will make sure to don’t forget this website and give it a look regularly.
Your writing style is so engagingI couldnt stop reading until the end. The information is valuable without feeling overwhelming at all.
you’re really a good webmaster. The web site loading speed is incredible. It seems that you are doing any unique trick. Furthermore, The contents are masterpiece. you have done a magnificent job on this topic!
Bạn cần truy cập đúng trang chủ 888slot trang chủ , sau đó điền đủ các thông tin cần thiết. Hãy đảm bảo thông tin này được nhập chính xác đầy đủ, vì đây sẽ là những thông tin quan trọng để bạn có thể đăng nhập và thực hiện giao dịch sau này. TONY12-26
What’s Happening i am new to this, I stumbled upon this I have found It absolutely useful and it has helped me out loads. I’m hoping to contribute & aid other customers like its helped me. Good job.
Good site! I truly love how it is simple on my eyes and the data are well written. I am wondering how I could be notified when a new post has been made. I have subscribed to your RSS which must do the trick! Have a nice day!
Hi there very cool website!! Man .. Excellent .. Wonderful .. I will bookmark your blog and take the feeds additionallyKI’m satisfied to search out so many useful information here in the post, we want work out more strategies on this regard, thanks for sharing. . . . . .
I went over this internet site and I think you have a lot of excellent info , saved to favorites (:.