Let’s be real, cleaning your makeup brushes is probably not your favorite thing to do. It’s easy to put off, right? But trust me, it’s super important. Dirty brushes can cause all sorts of problems, from breakouts to your makeup not looking as good as it should. Think of it like washing your clothes – you wouldn’t wear the same dirty outfit every day. Your makeup brushes deserve the same care! This guide will walk you through why it matters, how often to do it, and the best ways to get your favorite makeup brushes clean and ready for action.
Key Takeaways
- Regularly cleaning your makeup brushes helps prevent skin issues like breakouts and infections by removing bacteria and product buildup.
- Washing your makeup brushes keeps them in good condition, making them last longer and apply makeup more smoothly.
- The frequency of cleaning depends on how often you use a brush; daily use brushes need weekly washes, while others can be cleaned less often.
- When cleaning, use gentle cleansers and lukewarm water, and always rinse thoroughly, keeping water away from the handle’s base.
- Proper drying is vital: lay brushes flat on a towel with bristles hanging off the edge, avoiding heat sources, and reshape them while damp.
Why Cleaning Your Makeup Brushes Is Essential

Let’s be honest, cleaning makeup brushes isn’t exactly the most thrilling part of our beauty routine. It’s easy to put off, but skipping this step can actually cause more problems than you might think. Keeping your brushes clean is super important for a few key reasons, and it all comes down to good makeup brush hygiene.
Preventing Skin Breakouts
Think about it: every time you use a brush, it picks up bits of makeup, oil, and dead skin cells. Over time, this gunk can become a breeding ground for bacteria. When you then use that same brush on your face, you’re essentially spreading those germs around, which can lead to clogged pores and those annoying breakouts. Regular cleaning helps keep your skin clear and happy.
Maintaining Brush Quality
Your makeup brushes are an investment, right? When you don’t clean them, product can build up and harden in the bristles. This makes them stiff, scratchy, and less effective at applying makeup smoothly. Over time, this buildup can permanently damage the bristles, shortening the lifespan of your favorite tools. Proper cleaning keeps them soft and flexible, just like new.
Ensuring Product Payoff
Ever feel like your eyeshadow isn’t as vibrant or your foundation isn’t blending as well as it used to? Dirty brushes are often the culprit. The old makeup and product residue on the bristles can interfere with how new product is picked up and applied. This means you might end up using more product than necessary to get the look you want, and the finish just won’t be as polished. Clean brushes mean better color payoff and smoother application every time. For more on keeping your tools in top shape, check out this guide on brush care.
Neglecting your brushes means you’re not just risking breakouts; you’re also making your makeup application harder and potentially ruining your tools faster. It’s a simple step that makes a big difference.
How Often Should You Clean Your Makeup Brushes
Okay, so we all know we should clean our makeup brushes, but figuring out when can be tricky. It’s not a one-size-fits-all situation, and honestly, it depends on how much you’re using them and what for. The general rule of thumb is to give your brushes a good wash at least once a week. But let’s break it down a bit more.
Daily Use Brushes
If you’re reaching for certain brushes every single day, like your foundation or concealer brush, they need more frequent attention. Think about it – they’re picking up product and touching your skin constantly. For these workhorses, aim for a deep clean at least once a week. If you’re using cream or liquid products, you might even want to give them a quick rinse and clean every few days to prevent any buildup.
Infrequent Use Brushes
Brushes you don’t use daily, maybe your eyeshadow blending brush or a contour brush you only grab for special occasions, can get away with a bit less. A good rule of thumb here is to clean them about once a month. It’s still important to keep them free of dust and old product, but they aren’t accumulating the same level of grime as your everyday tools.
Specialty Brushes
This category includes things like lip brushes or very specific eye brushes that might only be used for one color or technique. While they might not need a weekly scrub, it’s still a good idea to clean them regularly, perhaps every two weeks or so, especially if you’re switching between different colored eyeshadows. Keeping these clean helps maintain the color payoff and prevents muddying.
Keeping your brushes clean isn’t just about hygiene; it’s about making sure your makeup applies smoothly and your brushes last longer. A dirty brush can harbor bacteria, leading to breakouts, and can also affect how your makeup looks.
Here’s a quick guide to help you remember:
- Foundation & Concealer Brushes: Weekly
- Eye Brushes (Shadow, Liner): Weekly (or more if switching colors often)
- Powder, Blush, Bronzer Brushes: Every 1-2 weeks
- Lip Brushes: Weekly
- Rarely Used Brushes: Monthly
Finding the best way to clean cosmetic brushes is all about consistency. Don’t stress too much about the exact day, but try to get into a routine that works for you. Your skin will thank you!
Gathering Your Makeup Brush Cleaning Supplies
Alright, let’s talk about what you’ll need to get those makeup brushes sparkling clean. You don’t need a whole lot of fancy stuff, honestly. The key is to use gentle products that won’t wreck your bristles.
Gentle Cleansers
When it comes to washing your brushes, think mild. You can grab a dedicated brush cleanser, which is formulated specifically for the job. Many makeup artists swear by them. Alternatively, a simple baby shampoo works wonders. It’s designed to be gentle, so it won’t strip the natural oils from your brush hairs. Some people even use a bit of mild dish soap, but I’d stick to the shampoo or a proper cleanser to be safe. For a DIY makeup brush cleaner, a mix of water and a few drops of baby shampoo is a great starting point.
Water Temperature
This one’s pretty straightforward: use lukewarm water. Hot water can damage the bristles, making them brittle and prone to falling out. Cold water just won’t cut through the makeup and oils as effectively. So, aim for that comfortable, in-between temperature. It makes the whole cleaning process much more pleasant, too.
Drying Materials
After you’ve washed your brushes, you’ll need something to dry them with. A clean, lint-free towel is perfect for gently pressing out excess water. Avoid paper towels if you can, as they can leave little bits of fuzz behind. For drying them flat, a clean surface like a countertop or a drying rack works well. You want something that allows air to circulate around the brushes.
Remember, the goal is to remove makeup, oil, and bacteria without damaging the brush itself. Using the right supplies makes a huge difference in how long your brushes last and how well they perform.
The Step-By-Step Deep Cleaning Process
Alright, let’s get down to business with actually cleaning those brushes. It might seem like a chore, but trust me, your skin will thank you later. This isn’t just about making them look pretty; it’s about keeping them working right and keeping gunk away from your face.
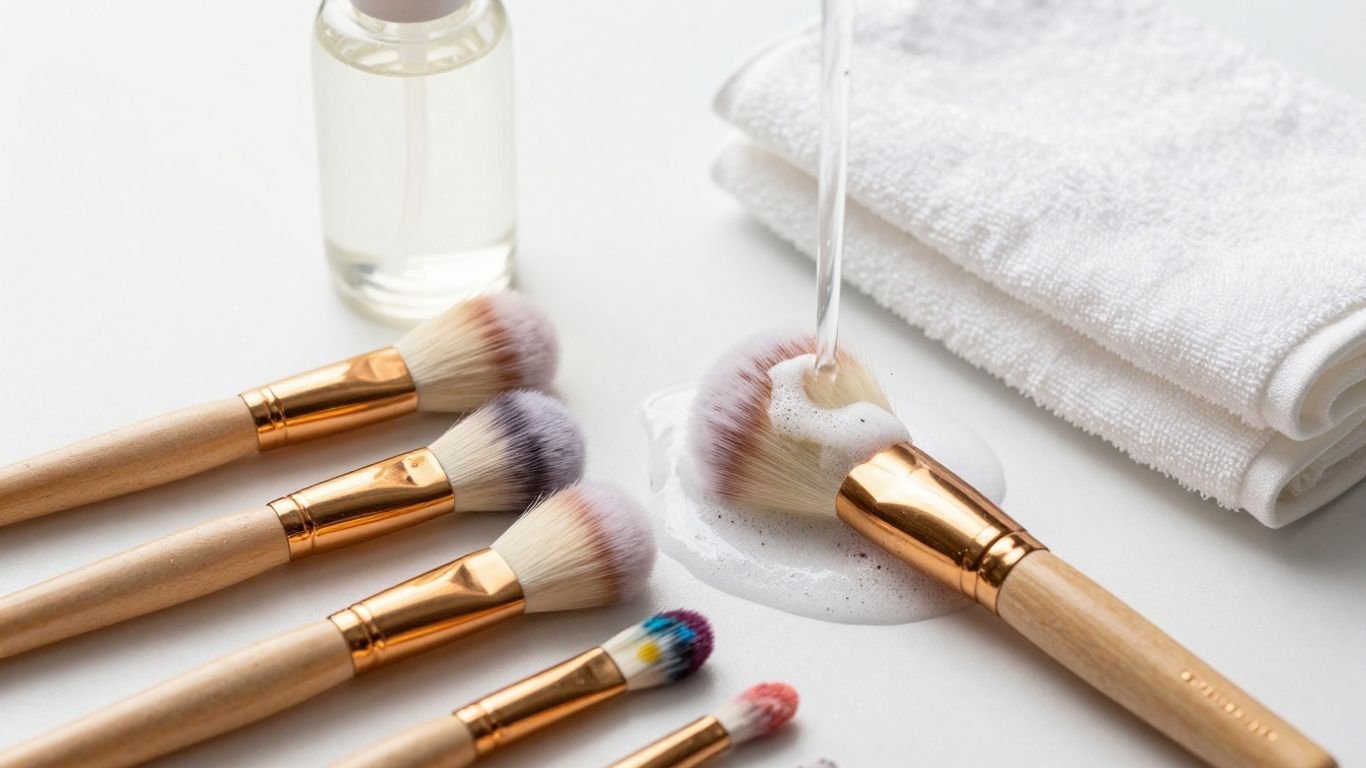
Rinsing the Bristles
First things first, get your brushes wet. Use lukewarm water – not hot, not cold, just comfortably warm. Hold the brush with the bristles pointing downwards and let the water run through them. This is super important because you don’t want any water getting trapped up in the metal part, the ferrule, where the bristles are glued in. If water gets in there, it can break down the glue over time and make your brush fall apart. Just a gentle rinse to get all the loose makeup out is the goal here. You can find some great brush cleaning tools that help with this part, making it easier to keep the ferrule dry while cleaning.
Lathering and Washing
Now for the actual washing part. You can use a gentle brush cleanser, or even a bit of baby shampoo works in a pinch. Put a little bit of cleanser onto your palm or a textured cleaning mat. Then, swirl the damp brush bristles into the cleanser. Work it around gently, making sure you get into all the nooks and crannies of the bristles. You’re trying to lift out all that makeup, oil, and whatever else has built up in there. Don’t be too rough, though; we want to treat these brushes nicely so they last.
Thorough Rinsing
Once you’ve got a good lather going and you feel like you’ve worked the cleanser in well, it’s time to rinse again. Just like before, hold the brush with the bristles facing down under that lukewarm running water. Keep rinsing until the water runs completely clear. You might need to do this a few times, especially if you’ve used a lot of product or a particularly pigmented makeup. Gently squeeze the bristles as you rinse to help push out any remaining soap and makeup.
Removing Excess Moisture
After rinsing, you’ll want to get as much water out as possible without damaging the bristles. Gently squeeze the bristles from the ferrule down towards the tip. You can also use a clean, lint-free towel to blot the bristles. Just press the towel around the brush head. Avoid twisting or rubbing the bristles vigorously, as this can mess up their shape and cause them to splay out. The goal is to get them damp, not soaking wet, before you move on to drying.
Proper Techniques for Drying Makeup Brushes
So, you’ve just finished giving your makeup brushes a good scrub. Awesome! But don’t just toss them aside to dry. The way you dry them is just as important as the cleaning itself. Doing it wrong can mess up the bristles, make them fall apart, or even damage the handle. Let’s get this right.
Laying Brushes Flat
This is probably the most important step. Always lay your brushes flat to dry. When you lay them flat, you’re letting gravity help keep the bristles in their original shape. If you stand them upright, water can seep down into the ferrule (that metal part) and loosen the glue holding the bristles together. Over time, this leads to shedding and a brush that just doesn’t perform well anymore. It’s a simple change that makes a big difference in how long your brushes last. This applies whether you’re wondering how to wash foundation brush or any other type.
Avoiding Heat Sources
Resist the urge to speed things up with a hairdryer or placing your brushes near a heater. Heat can warp the bristles, especially if they’re made of natural hair. It can also damage the glue and the handle material. Patience is key here. Let them air dry naturally. It might take a few hours, but your brushes will thank you for it.
Reshaping Bristles
After you’ve gently squeezed out most of the water with a clean towel, take a moment to reshape the bristles. Gently smooth them back into their original form. This helps them dry evenly and maintain their intended shape for flawless makeup application. Think of it like giving them a little spa treatment before they’re ready to be used again.
Drying your brushes properly is a small step that has a huge impact on their longevity and performance. Treat them with care, and they’ll continue to be your best tools for creating beautiful looks.
Here’s a quick rundown:
- Lay flat: Always dry brushes horizontally.
- No heat: Keep them away from hairdryers and heaters.
- Reshape: Gently smooth the bristles after squeezing out excess water.
- Patience: Allow them to air dry completely.

Quick Cleaning Solutions for On-The-Go
Life gets busy, right? Sometimes you just don’t have time for a full brush wash, but your makeup is looking a little… off. Maybe you’re touching up at work, or you’re traveling and need to switch looks. Don’t worry, there are ways to give your brushes a quick refresh without a whole sink situation.
Brush Cleansing Sprays
These are super handy for a fast clean. You just spray the product directly onto the bristles, give them a little swirl on a tissue or paper towel, and then you can use them again pretty quickly. They’re great for removing surface-level makeup and oil between deeper cleans. It’s like a mini-spa treatment for your brushes when you’re in a pinch. Some sprays are designed to dry almost instantly, which is a lifesaver when you’re in a hurry. You can find these in many beauty stores, and some are even travel-sized. For example, Cinema Secrets Makeup Brush Cleaner is a popular choice that works well for this purpose.
Antibacterial Spritzes
If you’re really concerned about germs, especially if you’re sharing tools or using them on different people, an antibacterial spritz is your friend. These often contain alcohol, which helps kill off bacteria. You can spray it on, wipe the brush, and it’s ready to go. Just be mindful that if you’re using a high concentration of alcohol, it can potentially dry out natural bristles over time, so it’s best used sparingly for quick touch-ups. Always check the ingredients and maybe dilute it a bit if you’re concerned. A little goes a long way here.
Using Hand Sanitizer
Okay, this one might sound a bit odd, but it can work in a real emergency. If you have absolutely nothing else, a tiny bit of alcohol-based hand sanitizer on a tissue can help clean off some product and kill germs. Just make sure it’s alcohol-based and use a very small amount. Rub your brush bristles gently on the tissue with the sanitizer.
Again, this isn’t ideal for regular cleaning because the ingredients aren’t formulated for makeup brushes and could potentially damage them with frequent use. It’s more of a last resort when you need to disinfect a brush immediately and can’t get to your proper cleaning supplies. It’s a good idea to follow up with a proper wash as soon as you can.
So, Go Forth and Clean!
Alright, so maybe cleaning your makeup brushes isn’t exactly a thrill-a-minute activity, but honestly, it’s totally worth the little bit of effort. Think of it like this: you wouldn’t wear the same dirty clothes every day, right? Your brushes deserve the same respect! Keeping them clean means your makeup will go on smoother, last longer, and most importantly, your skin will be a lot happier. So, grab your cleanser, put on some music, and give those tools some love. Your face will definitely thank you for it.
Frequently Asked Questions
Why is it so important to clean my makeup brushes?
Cleaning your makeup brushes is super important because dirty brushes can spread germs and bacteria. This can lead to annoying pimples and other skin problems. Plus, old makeup gunk on your brushes makes your makeup look streaky and not as good as it could.
How often should I really be washing my brushes?
For brushes you use every day, like for foundation or concealer, try to wash them at least once a week. Brushes for eyeshadow or blush can probably go a bit longer, maybe every two weeks. If you don’t use a brush very often, cleaning it once a month should be fine.
What’s the best way to clean my brushes without ruining them?
You should use a gentle soap, like baby shampoo or a special brush cleaner. Wash the bristles under lukewarm water, making sure not to get the metal part (the ferrule) too wet, as this can loosen the glue. Swirl the brush in the soap and rinse until the water runs clear.
How should I dry my makeup brushes after cleaning?
After washing, gently squeeze out extra water with a clean towel. Then, lay the brushes flat on a towel to dry, letting the brush heads hang off the edge a little. This helps them keep their shape and stops water from damaging the glue.
Can I use quick cleaning sprays if I’m in a hurry?
Yes, brush cleansing sprays are great for a quick refresh between deep cleans! They can help remove surface makeup and kill some germs. Just spray it on, wipe the brush with a tissue, and let it dry. Some sprays even have alcohol to disinfect.
What happens if I don’t clean my brushes?
If you skip cleaning your brushes, they’ll get clogged with old makeup, oil, and dead skin cells. This creates a perfect home for bacteria, which can cause breakouts and skin infections. Your makeup also won’t go on smoothly, and the brushes themselves might get damaged over time.
When you’re short on time, these quick fixes can really save your look—just remember they’re a temporary solution, not a replacement for a proper deep clean. For more beauty tips and local product picks, check out our Singapore makeup: your ultimate guide.