Skull makeup used to be just for Halloween, right? But these days, it’s totally different. People are getting super creative with it, turning it into a real art form that’s both spooky and really pretty. It’s not just about scary anymore; you can make it look super chic too. So, if you’ve ever wanted to try your hand at this cool style, you’re in the right place.
Key Takeaways
- Getting your supplies ready and prepping your face makes a big difference for any skull makeup look.
- Learning how to draw the main skull shapes and use shading helps make your design pop.
- You can do all sorts of skull makeup, from simple spooky to really fancy and artistic.
- Knowing how to set your makeup means your skull design will stay put all night.
- Don’t be afraid to try different ideas and practice; that’s how you get good at skull makeup.

Mastering the Basics of Skull Makeup
Essential Tools and Materials for Skull Makeup
Okay, so you wanna rock a skull face? First, you gotta gather your gear. Think of it like prepping for battle, but with brushes and paint instead of swords and shields. You’ll need a good quality white face paint as your base – don’t skimp here, or it’ll look patchy.
Black face paint or a really pigmented black eyeshadow is a must for the shading and details. Brushes are key: get a variety of sizes, from a big fluffy one for blending to a tiny detail brush for the teeth. Sponges are great for applying the base evenly. And don’t forget setting spray! You don’t want your masterpiece melting off halfway through the night. Some people like using pencil eyeliner for outlining, but liquid works too if you’re steady-handed.
Preparing Your Canvas for Skull Makeup
Before you even think about picking up a brush, prep your face! This is super important. Start with a clean, moisturized face. Seriously, don’t skip the moisturizer, or your skin will feel like the Sahara Desert by the end of the night. If you have oily skin, use a mattifying primer to keep the paint from sliding around. This step is all about creating a smooth, even surface for the makeup to adhere to. Think of it like prepping a wall before painting – you wouldn’t just slap paint on a dirty wall, would you?
Laying the Foundation for Your Skull Design
Alright, time to get spooky! Start by applying a thin, even layer of white face paint all over your face and neck. This is your foundation, so make sure it’s smooth and opaque. You might need a couple of layers to get full coverage. Use a damp sponge for the best results – it’ll help prevent streaks. Once you’re happy with the white base, let it dry completely before moving on to the next step. This will prevent the black from smudging into the white and creating a muddy mess. Trust me, patience is key here!
Skull makeup is not only a trendy choice for events like Halloween but is also popular for artistic expression throughout the year. It’s crucial to understand the foundational techniques of skull makeup, which include the right application methods, color choices, and tools.

Step-by-Step Skull Makeup Application
Outlining the Core Skull Structure
Okay, so you’re ready to get started? Awesome! First things first, you gotta map out the skull on your face. I like to think of it as drawing a rough draft before the final masterpiece. Start with a light color, like a white or light gray eyeliner pencil. This makes it easy to correct mistakes without leaving harsh marks.
- Outline the eye sockets: These are usually large, rounded shapes around your eyes, extending towards your temples.
- Define the nose cavity: A simple triangle or heart shape works well here. Make sure it’s centered!
- Map out the jawline: This is where you’ll create the illusion of missing cheeks. Draw a line from your cheekbones down to your chin, curving inwards to create a hollow effect. This is where you can use organic makeup to create a natural finish.
Don’t stress about perfection at this stage. It’s just a guide. The goal is to get a general idea of where everything will go. You can always adjust and refine as you go along.
Creating Depth with Shading Techniques
This is where the magic happens! Shading is key to making your skull makeup look realistic and not just like a flat drawing. Grab your black and gray eyeshadows (or face paints) and get ready to sculpt!
- Hollow out the eye sockets and nose cavity: Use a black eyeshadow and a fluffy brush to create depth. Blend, blend, blend! The goal is to create a seamless transition from dark to light.
- Define the cheekbones: Emphasize the hollows of your cheeks by applying a dark gray or black shade along the jawline you mapped out earlier. Blend upwards towards your temples to create a sunken effect.
- Add subtle shadows: Use a light gray or brown shade to add subtle shadows around your forehead, temples, and chin. This will add dimension and prevent your skull from looking too flat.
Adding Realistic Bone Details
Now for the fun part: adding the details that will really bring your skull to life! This is where you can get creative and add your own personal touch.
- Draw the teeth: The teeth are a crucial element of any skull makeup look. Use a white eyeliner or face paint to draw individual teeth along your mouth. Don’t make them perfectly straight – slightly crooked teeth look more realistic. You can use a pencil eyeliner to outline the main portions of your skull in black.
- Add cracks and fissures: Use a fine-tipped brush and a dark gray or black paint to add small cracks and fissures to your skull. Focus on areas like the forehead, cheekbones, and jawline.
- Highlight the bone structure: Use a white or light gray highlighter to accentuate the high points of your skull, such as the cheekbones, brow bone, and chin. This will create a more three-dimensional effect.

Creative Variations of Skull Makeup
Skull makeup doesn’t have to be the same old bone-chilling look every time. Let’s explore some ways to spice things up and make your skull stand out from the graveyard crowd. It’s all about pushing boundaries and having fun with it!
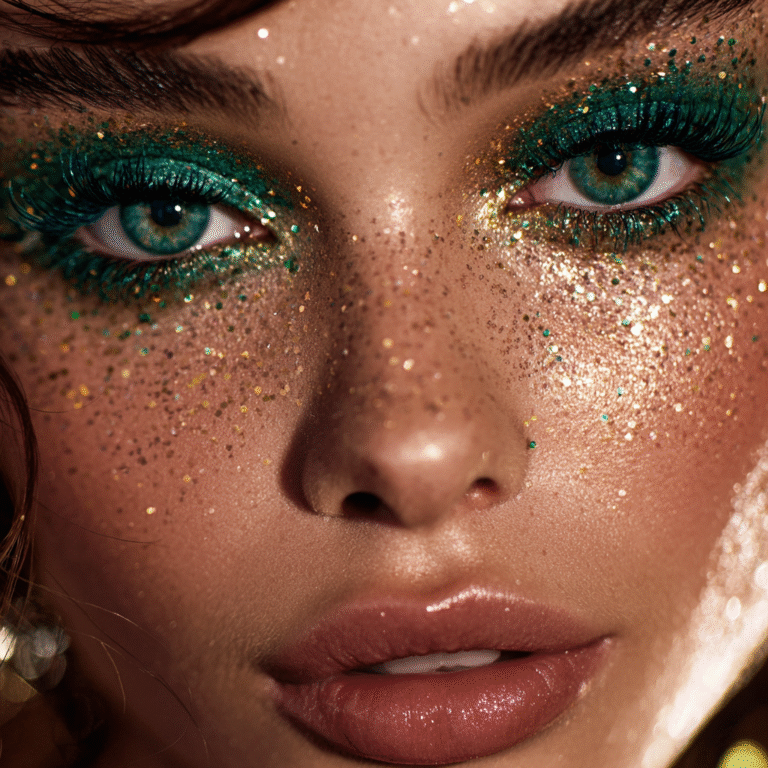
Glamorous Skull Makeup Looks
Who says skulls can’t be glamorous? Transform your spooky skull into a dazzling masterpiece by incorporating glitter, rhinestones, and bold colors. Instead of the traditional black and white, try using metallic shades like gold, silver, or bronze for the bone structure. Add a smoky eye with shimmering eyeshadows and a bold lip color (think deep reds or purples) to complete the look. Don’t be afraid to go over the top – the goal is to make a statement! Consider adding some easy face paint to make it pop.
Incorporating Floral Elements into Skull Makeup
One of the most popular trends is blending the macabre with the beauty of nature. Floral skull makeup is all about juxtaposing the harshness of the skull with the softness and vibrancy of flowers. Here’s how to nail it:
- Placement is key: Arrange flowers around the eye sockets, along the jawline, or even cascading down the forehead.
- Color coordination: Choose flowers that complement your overall color scheme. Bright, bold colors create a striking contrast against the dark skull, while pastel shades offer a more delicate and ethereal look.
- Flower types: Roses, sunflowers, and daisies are popular choices, but feel free to experiment with different varieties to create a unique design.
I tried this last year, and it was way easier than I thought! I just bought some fake flowers from the craft store and glued them on with eyelash glue. It looked amazing and lasted all night!
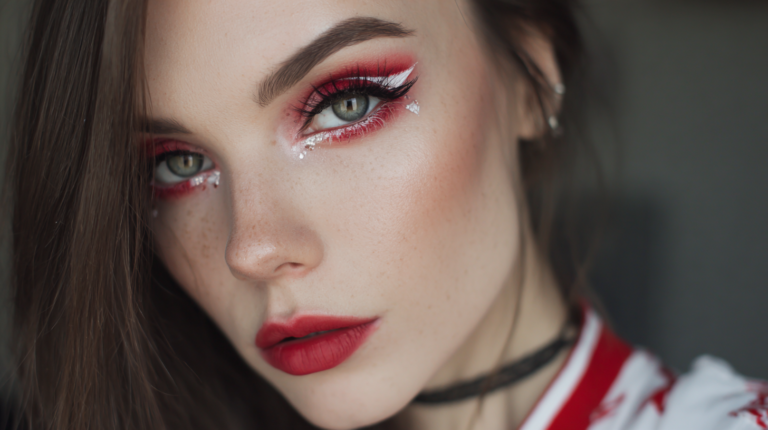
Half-Face Skull Makeup Designs
Want something a little less intense? Half-face skull makeup is a great option. It allows you to showcase your artistic skills while still maintaining a touch of your natural beauty. This style is perfect for those who want a more subtle yet striking look. You can create a seamless transition between the skull and your regular makeup, or go for a more dramatic contrast. Consider these ideas:
- Symmetry vs. Asymmetry: Decide whether you want the skull to be perfectly symmetrical or slightly off-kilter for a more edgy vibe.
- Blending Techniques: Use blending techniques to soften the edges of the skull and create a smooth transition to your skin.
- Color Palette: Experiment with different color palettes to create a unique and personalized look. You can use traditional black and white, or incorporate pops of color to add visual interest.
Ensuring Your Skull Makeup Lasts

Let’s be real, spending hours creating an awesome skull makeup look only for it to fade or smudge halfway through the night is a total bummer. Here’s how to make sure your spooky masterpiece stays put.
Setting Your Skull Makeup for Longevity
Setting spray is your best friend. Seriously, don’t skip this step. After you’ve finished applying all the details, grab a good quality setting spray and mist your face generously. I like to do a couple of layers, letting each one dry in between. This helps lock everything in place and prevents smudging. Think of it like hairspray for your face! You can also use a translucent powder to “bake” your makeup, especially in areas prone to creasing, like under the eyes or around the mouth. This involves applying a thick layer of powder, letting it sit for a few minutes, and then dusting off the excess. This easy Halloween makeup technique will help your makeup last longer.
Touch-Up Tips for All-Night Wear
Even with the best setting techniques, sometimes you need a little touch-up. Carry a small compact mirror, your setting spray, and a small brush with you. If you notice any fading or smudging, gently pat the area with the brush to blend it back in, then reapply setting spray. For oily skin, blotting papers are a lifesaver. They absorb excess oil without disturbing your makeup. Here are some things to keep in mind:
- Avoid touching your face as much as possible.
- Reapply setting spray every few hours, especially if you’re dancing or sweating.
- Use a lip sealant if you’re wearing dark lipstick to prevent feathering.
A little planning goes a long way. Before you even start applying your makeup, consider the environment you’ll be in. If you know you’ll be in a hot, crowded space, opt for waterproof or sweat-resistant products. And always do a test run beforehand to see how your makeup holds up over time.
Removing Your Skull Makeup Safely
Taking off skull makeup can be a bit of a process, especially if you’ve used a lot of heavy pigments or face paint. Don’t just scrub at your face with a makeup wipe! That’s a recipe for irritation. Instead, start with an oil-based cleanser or makeup remover to break down the makeup. Gently massage it into your skin, then rinse with warm water. Follow up with a gentle cleanser to remove any remaining residue. Here’s a simple routine:
- Use an oil-based cleanser to dissolve the makeup.
- Follow with a gentle, hydrating cleanser.
- Apply a moisturizer to replenish your skin’s moisture barrier.

Advanced Skull Makeup Techniques
Sculpting with Light and Shadow
Okay, so you’ve got the basic skull down. Now it’s time to really make it POP. Think of your face as a 3D canvas. It’s all about playing with light and shadow to create the illusion of bone structure that isn’t really there.
- Use a matte white or very light grey to highlight areas like the brow bone, cheekbones, and the bridge of the nose. This brings those areas forward.
- Contour with a dark grey or black in the hollows of your cheeks, temples, and around the eye sockets. This pushes those areas back, creating depth.
- Blend, blend, blend! Harsh lines are a no-no. You want a smooth transition between light and shadow for a realistic effect.
Don’t be afraid to experiment. Look at real skull photos for reference and try to mimic the way light naturally falls on bone. It takes practice, but it’s worth it.
Adding Intricate Details to Skull Makeup
This is where you can really let your creativity shine. Forget the basic black and white – let’s add some flair! Think about adding cracks, sutures (those little lines on the skull), or even some decay for a truly gruesome look.
- Use a fine-tipped brush and a dark grey or brown to draw in cracks and sutures. Keep them irregular and asymmetrical for a more realistic look.
- Try using stipple sponges to create a textured effect, mimicking the look of bone. Setting spray is important to keep everything in place.
- Consider adding some fake blood or gore for a truly terrifying effect. Just be careful not to get it in your eyes!
Experimenting with Color in Skull Makeup
Who says skulls have to be black and white? Let’s break the mold! Adding color can take your skull makeup from spooky to stunning. Think sugar skulls, neon skulls, or even galaxy-inspired skulls.
- Use bright colors like pink, blue, and purple to create a sugar skull look. Add floral details for extra flair.
- Try using neon pigments for a glow-in-the-dark effect. Perfect for parties!
- Experiment with different color combinations to create a unique and eye-catching look. The possibilities are endless!
Styling Your Skull Makeup Look

Skull makeup is more than just face paint; it’s a statement. It’s about bringing together all the elements to create a cohesive and striking visual. Let’s explore how to take your skull makeup from cool to unforgettable.
Complementing Your Skull Makeup with Attire
Choosing the right clothes can really make or break your skull makeup look. Think about the overall vibe you’re going for. Are you aiming for spooky, glamorous, or something in between? For a classic, edgy look, all-black attire is always a solid choice. A black dress, leather jacket, or even a simple black top and pants can provide a great backdrop for your skull makeup to really pop.
If you’re going for a more glamorous take, consider incorporating some dark jewel tones like deep reds, purples, or greens. Velvet or lace fabrics can add a touch of elegance. Don’t be afraid to experiment with different textures and silhouettes to find what works best for you. If you’re doing a full neck and chest, I love to wear a black bandeau to show off that work.
Accessorizing Your Skull Makeup Ensemble
Accessories are key to elevating your skull makeup look. Consider adding elements that enhance the theme without overpowering it. For a spooky vibe, think about incorporating dark, gothic-inspired jewelry like chokers, long necklaces with pendants, or statement rings. If you’re going for a glamorous look, opt for sparkly earrings, a jeweled headpiece, or even a bold lip color that complements your makeup. Hats can also be a fun addition. A wide-brimmed hat can add a touch of mystery, while a beanie can give off a more casual, edgy vibe. Remember to keep the overall balance in mind. You don’t want your accessories to compete with your makeup; instead, they should enhance it.
- Dark, gothic jewelry
- Sparkly earrings or headpiece
- Wide-brimmed hat or beanie
Photo-Ready Poses for Skull Makeup
Getting the perfect photo to capture your skull makeup look is essential. Think about poses that highlight the details of your makeup and showcase your overall style. Experiment with different angles and lighting to find what works best for you. Consider these tips:
- Highlight the details: Position yourself to showcase the intricate details of your skull makeup, such as the shading, bone structure, or any floral elements you’ve incorporated.
- Play with lighting: Experiment with different lighting setups to create different moods. Soft lighting can create a more glamorous look, while harsh lighting can enhance the spooky vibe.
- Use props: Incorporate props like flowers, candles, or even a skull to add visual interest to your photos.
Don’t be afraid to get creative and have fun with your poses. The most important thing is to capture the essence of your skull makeup look and express your personal style. Remember to practice your poses in front of a mirror before taking photos to ensure you’re comfortable and confident.
It’s the same concept as regular makeup, except with skull makeup for halloween.
Your Next Skull Look
So, that’s the scoop on skull makeup. It might look like a big deal, but it’s really just about getting started and trying things out. You can make it scary for Halloween or add some cool stuff for a party. Don’t stress if your first try isn’t exactly what you pictured. Nobody gets it perfect right away. Just keep practicing, and you’ll get better. It’s a neat way to be creative, and it always gets people talking. So, get your makeup ready, find some pictures you like, and just have fun with it. You’ll be amazed at what you can create.

Frequently Asked Questions
What makeup items do I need for skull makeup?
For skull makeup, you’ll mainly need face paint in black and white, often the kind that mixes with water. A black eyeliner pencil is also super useful for drawing fine lines. Don’t forget a set of brushes and sponges to apply the paint smoothly. And a setting spray is a must-have to keep your amazing artwork from smudging or fading throughout the day or night.
Is skull makeup hard for beginners?
It might look really complicated, but skull makeup can actually be quite simple, even if you’re new to it! The trick is to start with easier designs and practice a bit. Looking at pictures for ideas can also help a lot. Many people find that once they try it, it’s not as hard as they first thought, especially getting the basic skull shape down.
How can I make my skull makeup stay on all night?
To make sure your skull makeup stays perfect for hours, the most important step is to use a good setting spray. After you’ve finished all your painting and detailing, lightly mist your face with the spray. This helps to lock everything in place. If you notice any small smudges later, you can gently fix them with a tiny brush and a bit of paint.
Can I do a skull makeup look that’s not scary?
Absolutely! Skull makeup doesn’t always have to be scary. You can make it look very stylish or even beautiful. Try adding sparkly glitter, bright colors, or even drawing pretty flowers into your design. Half-face looks are also popular, where one side is a skull and the other is regular makeup, creating a cool and interesting contrast.
What’s the best way to take off skull makeup?
Taking off skull makeup is usually pretty straightforward. Most face paints can be washed off with just soap and water. You can also use makeup remover wipes or a gentle cleansing oil to help break down the paint. Remember to be gentle with your skin, especially around your eyes, to avoid any irritation.
Can I wear regular clothes with skull makeup?
Yes, you totally can! A great thing about skull makeup is that it can be the main part of your costume. You don’t need a fancy outfit to go with it. Many people simply wear all black clothes, like a black shirt or a simple top, to let the detailed makeup really stand out. It makes for a super easy and effective costume, especially for Halloween.


Идеальные источники бесперебойного питания для дома, разберитесь.
Обзор источников бесперебойного питания, изучайте.
Почему стоит купить ИБП, в нашем материале.
Рекомендации по выбору источников бесперебойного питания, на нашем сайте.
Источники бесперебойного питания: что важно знать, получите советы.
Как не ошибиться при выборе ИБП, узнайте.
Ваш идеальный ИБП, в нашем гиде.
Как работает источник бесперебойного питания, читайте.
Эффективное использование ИБП, в этой статье.
Что нового в мире ИБП, ознакомьтесь.
Основные рекомендации по использованию ИБП, читайте.
ИБП для дома и офиса: выбор и рекомендации, в нашем блоге.
Как выбрать оптимальный ИБП, узнайте.
Все о различных типах источников бесперебойного питания, читайте.
Пошаговая инструкция по установке ИБП, узнайте.
Идеальные решения для бесперебойного питания, в нашем блоге.
Как продлить срок службы ИБП, читайте.
Сравнение моделей источников бесперебойного питания, узнайте.
Топ-10 источников бесперебойного питания на рынке, в гиде.
источники бесперебойного питания купить [url=http://www.istochniki-bespereboynogo-pitaniya.ru/#источники-бесперебойного-питания-купить]http://www.istochniki-bespereboynogo-pitaniya.ru/[/url] .
**mindvault**
mindvault is a premium cognitive support formula created for adults 45+. It’s thoughtfully designed to help maintain clear thinking
My brother recommended I might like this website. He was totally right. This post actually made my day. You can not imagine simply how much time I had spent for this information! Thanks!